

Google Ads bids better when it learns which clicks turned into real leads and paying clients. That only works if the Google click ID (GCLID) from the ad click travels with the lead into your CRM and comes back to Google when the lead moves forward. For businesses that run on calls and forms, the click ID gets dropped in a few predictable places.
This guide walks through the full setup we use with CallRail, HubSpot, Gravity Forms and Google Ads. It covers every handoff, from the ad click to the conversion that lands back in Google Ads.
Where the click ID gets lost
HubSpot has a built-in contact property called Google Click ID. Its tracking code fills it when an ad visitor lands on your site and becomes a contact. HubSpot’s own conversion events read that property when they report a lead or a customer back to Google Ads.
Two kinds of leads skip that path:
- Calls from the ad’s call button. The caller never visits your site, so HubSpot never sees a click ID. CallRail does see it, through Google’s call details forwarding, but it has to be passed along.
- Forms built outside HubSpot. A Gravity Forms entry goes to HubSpot from your web server, not the visitor’s browser. HubSpot only receives the fields the form sends.
The fix is to give both a place to land, then copy the value into the field HubSpot’s conversion events read.
How the pieces fit
- A visitor clicks an ad. Google adds a gclid to the landing page URL and stores it in a first-party cookie.
- CallRail records the click ID for calls and form submissions it tracks and writes it to a HubSpot contact property named
gclid. - A small Google Tag Manager tag puts the click ID into a hidden Gravity Forms field, and the form’s HubSpot feed writes it to the same
gclidproperty. - A HubSpot workflow copies
gclidinto HubSpot’s built-in Google Click ID when that field is empty. - HubSpot sends lifecycle stage conversions to Google Ads. CallRail sends calls and forms to Google Ads directly.
- Google Ads counts the conversions that are set as primary in your account goals.
Step 1: Connect CallRail to HubSpot
In CallRail, open Integrations, find HubSpot and authorize it with the HubSpot account you want to use. Once it shows Active, choose what to send. We send inbound calls, outbound calls, forms and text messages, and let CallRail create a new contact when it can’t find one.
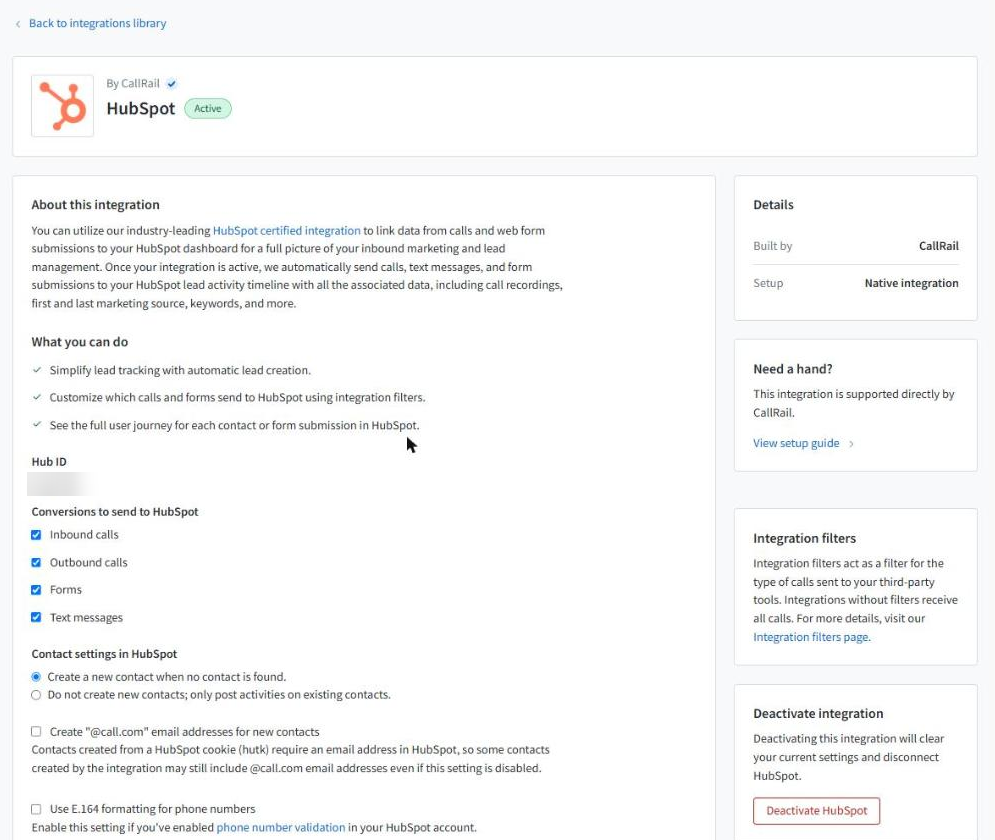
CallRail sends each call, text and form to the contact’s timeline along with its attribution data, and its documentation lists the website pool gclid among the values it sends. What it doesn’t have is a setting for which contact property should hold that click ID.
Step 2: Create a gclid property in HubSpot
HubSpot matches incoming values to contact properties by internal name. If a single-line text property named gclid exists, the click ID CallRail sends lands there. Without it, the click ID stays buried inside the call activity.
Go to Settings, then Properties, then Create property. Choose Contact, label it GCLID and check that the internal name reads gclid. Use the single-line text field type.
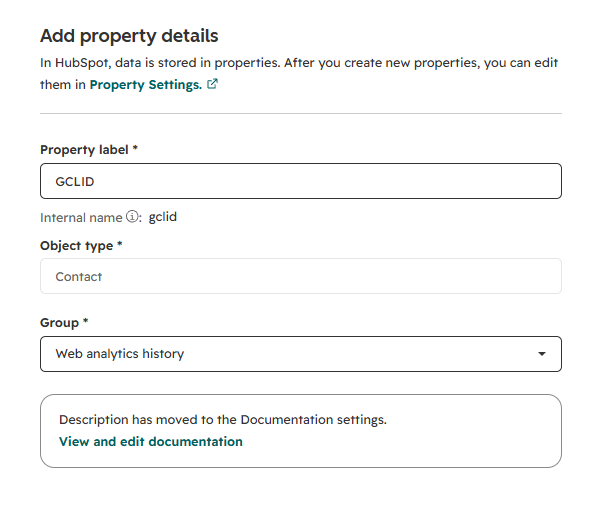
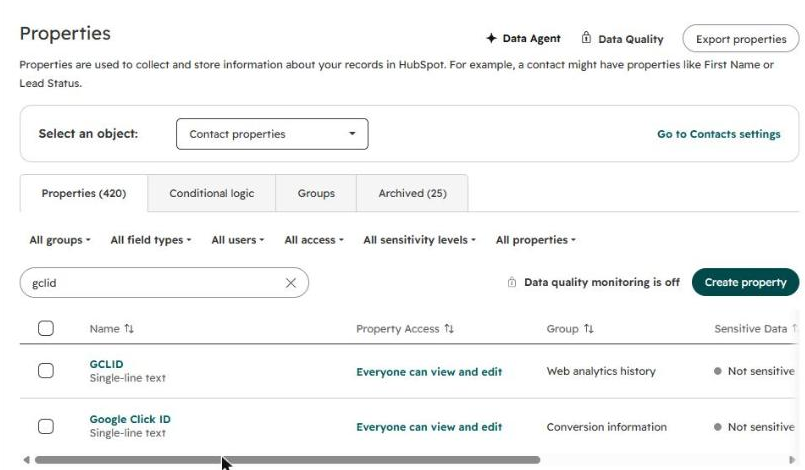
When you’re done, a search for “gclid” should show two properties: your custom GCLID and HubSpot’s built-in Google Click ID. Keep both. They do different jobs.
Step 3: Capture the click ID on your site
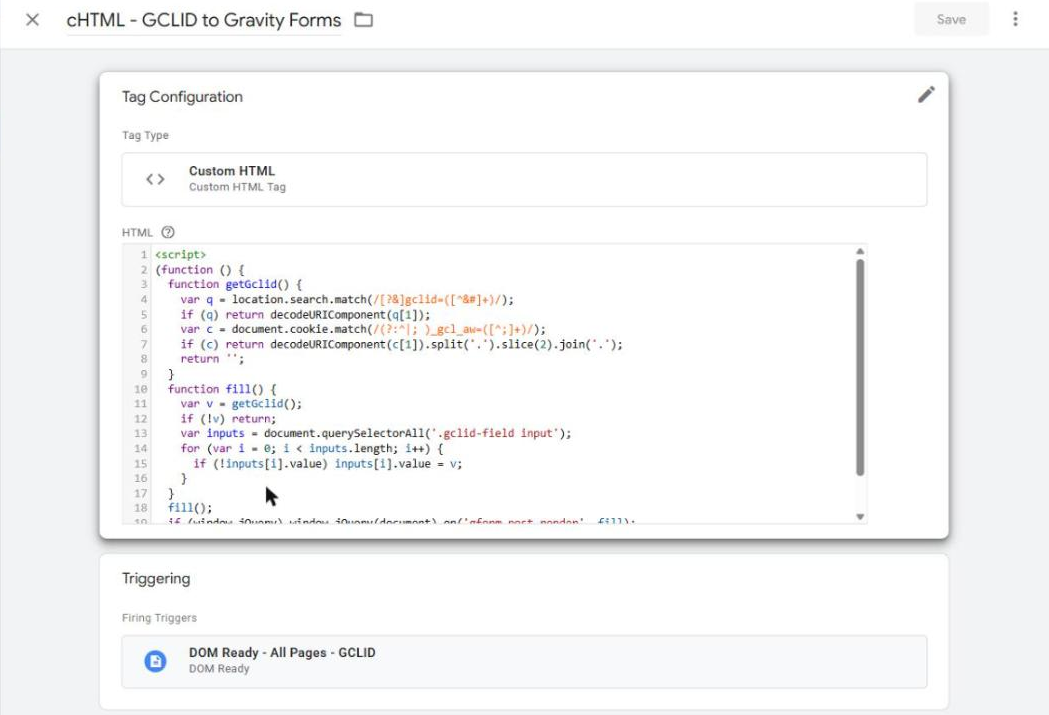
A visitor often lands on one page and fills out the form on another, so the gclid is gone from the URL by the time they submit. Google keeps it in the _gcl_aw cookie on your root domain. This Google Tag Manager tag reads the URL first, falls back to the cookie and fills any field wrapped in the class gclid-field.
<script>
(function () {
  function getGclid() {
    var q = location.search.match(/[?&]gclid=([^&#]+)/);
    if (q) return decodeURIComponent(q[1]);
    var c = document.cookie.match(/(?:^|; )_gcl_aw=([^;]+)/);
    if (c) return decodeURIComponent(c[1]).split('.').slice(2).join('.');
    return '';
  }
  function fill() {
    var v = getGclid();
    if (!v) return;
    var inputs = document.querySelectorAll('.gclid-field input');
    for (var i = 0; i < inputs.length; i++) {
      if (!inputs[i].value) inputs[i].value = v;
    }
  }
  fill();
  if (window.jQuery) window.jQuery(document).on('gform_post_render', fill);
})();
</script>
Create it as a Custom HTML tag and fire it on a DOM Ready trigger for all pages. The gform_post_render line refills the field when Gravity Forms redraws a multi-page form.
This only works if Google Ads auto-tagging is on and the _gcl_aw cookie is being set, which the Google tag or a Conversion Linker tag handles.
Step 4: Add a hidden field to Gravity Forms
Add a Single Line Text field labeled GCLID to the form. Under Appearance, set the Custom CSS Class to gclid-field so the tag can find it. Under Advanced, set Visibility to Hidden, turn on “Allow field to be populated dynamically” and use gclid as the parameter name. That parameter also fills the field straight from the URL when the visitor lands on the form page.
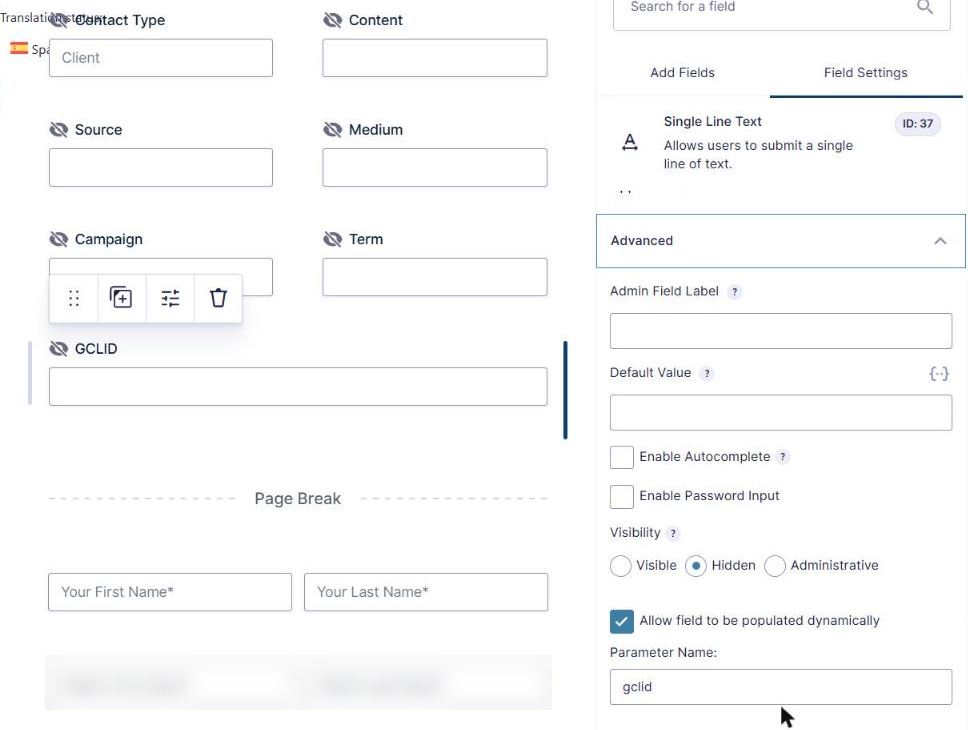
Then open the form’s HubSpot feed and add a row that maps the HubSpot GCLID property to the new field.

Test it before you move on. Load a page with ?gclid=TEST123 on the end of the URL, click through to the form and submit it. The Gravity Forms entry should show TEST123, and so should the GCLID property on the HubSpot contact. Delete the test entry and contact afterward.
Step 5: Copy gclid into HubSpot’s Google Click ID
This is the step most setups miss. HubSpot’s ad conversion events need a value in the Google ad click ID property, which is the built-in Google Click ID, not your custom GCLID. Visitors who came through your site usually have both. Callers from the ad’s call button only have the custom one.
Build a contact workflow in HubSpot:
- Enroll when GCLID is known, Google Click ID is unknown, and GCLID does not contain a semicolon.
- Action: copy the value of GCLID into Google Click ID.
- Re-enrollment: on, for when GCLID changes.
Two details matter. The copy has to happen before the contact reaches the lifecycle stage that triggers a conversion, so it should run as soon as the click ID arrives. And it only fills blanks, so it never overwrites a click ID HubSpot captured on its own. Run it on one test contact first and confirm the value sticks before you turn it on.
The semicolon rule exists because two systems now write to the same property. When a contact gets a second value, it can end up joined to the first, like abc;xyz. Google can’t read that, and HubSpot flags those sends as an unreadable click ID.
Step 6: Send lifecycle stages from HubSpot to Google Ads
Connect your Google Ads account under Marketing, then Ads. On the Conversion Events tab, create one event for each lifecycle stage you want Google to learn from, such as a qualified lead and a new customer.
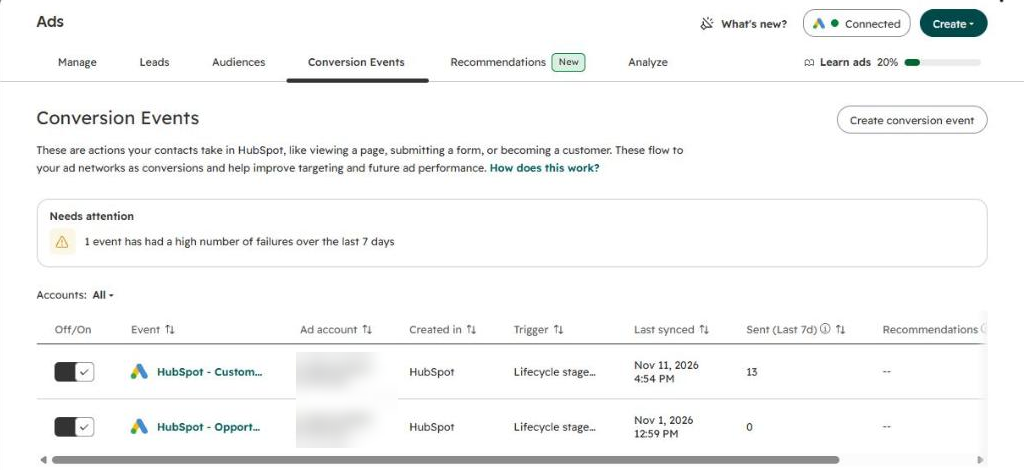
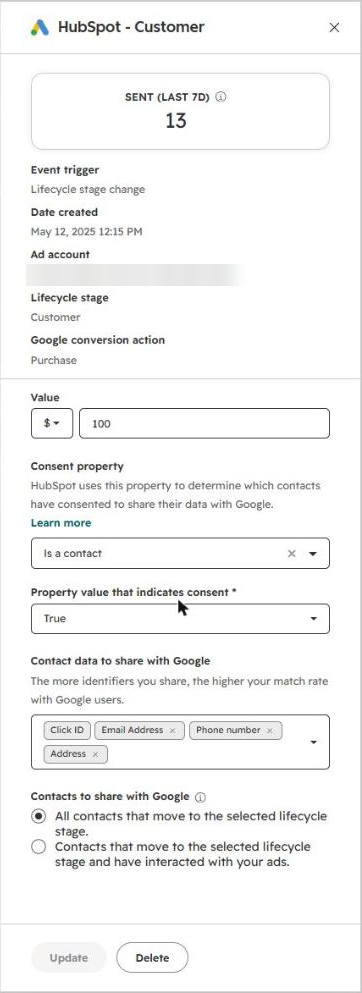
For each event, check four settings:
- Value. HubSpot sends one fixed value per event. Pick values that reflect what each stage is worth to you.
- Contact data to share. Click ID plus email, phone and address gives Google the most ways to match. HubSpot uses Google’s enhanced conversions for leads, which matches on hashed contact details when there is no click ID.
- Contacts to share. “Interacted with your ads” sends only ad-driven contacts. “All contacts” sends everyone who reaches the stage and lets Google sort out which ones it can match.
- The stage itself. Check which stage your forms set on submission. If every new form lead lands in the stage you picked, that event fires on every form, not just qualified leads.
Step 7: Send calls and forms from CallRail to Google Ads
HubSpot reports later stages. CallRail reports the calls and forms themselves, which happen sooner and in greater numbers. In CallRail, open Integrations, then Google Ads, and connect the Google Ads account. CallRail creates the conversion actions for you.
Choose separate conversion actions for first-time callers and repeat callers. First-time calls are the ones worth bidding on. Repeat calls should stay out of your goals so one caller doesn’t count twice.
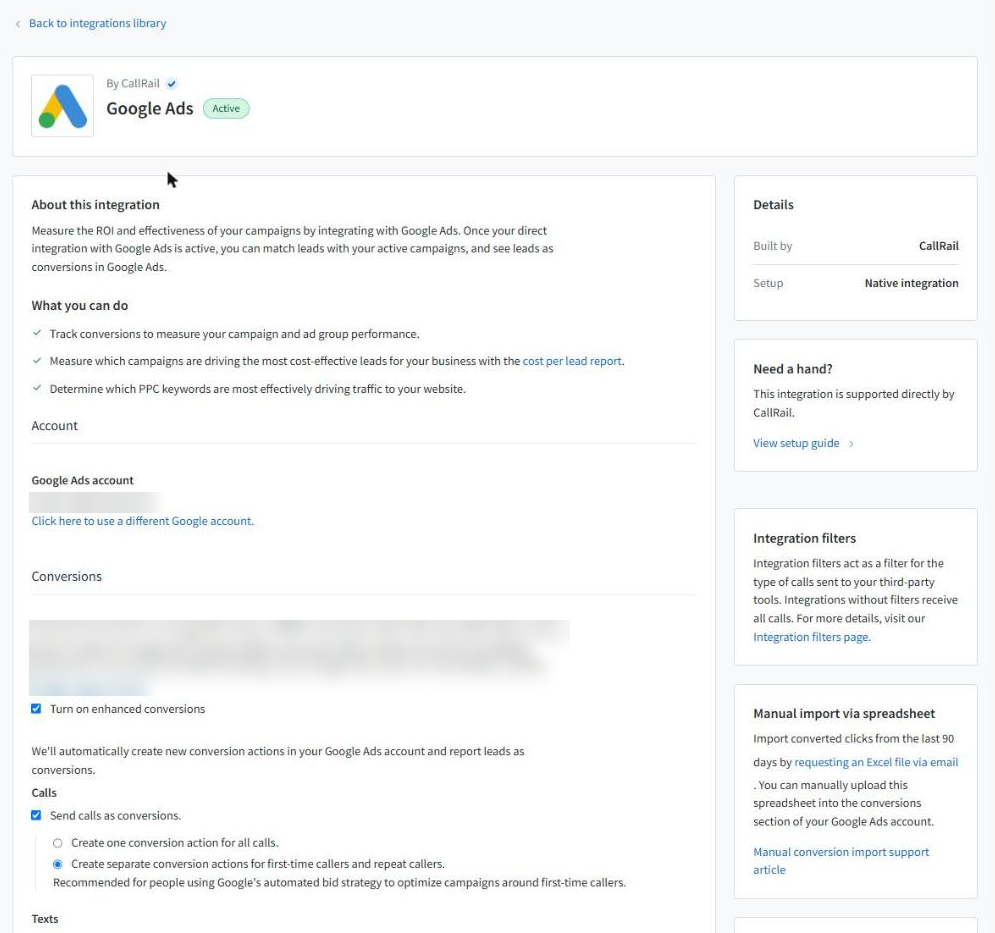
CallRail also has an account-level Google connection used for bulk setups. If it shows Inactive while the company-level connection shows Active, the company connection is the one doing the work.
Step 8: Make sure Google Ads counts them
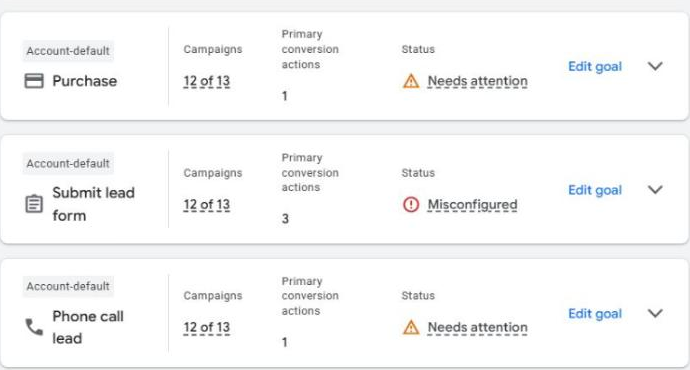
A conversion only steers bidding if it is a primary action in a goal your campaigns use. In Google Ads, go to Goals, then Summary.
- Open each conversion action from CallRail and HubSpot and set it to primary.
- Make sure the goal it sits in is marked Account-default, or added to each campaign’s goals.
- Set repeat callers and anything you don’t want to bid on to secondary before you save, since every primary action in an account-default goal counts.
- Use a click window that covers your sales cycle. Thirty days drops anyone who converts later. Ninety is the maximum.
Test it end to end
- Submit the form with a test gclid and confirm it reaches the Gravity Forms entry and the HubSpot GCLID property.
- Confirm the workflow copied it into Google Click ID.
- Check a recent ad caller in HubSpot. GCLID should show “Integration: CallRail” in its history.
- Move a test contact to a tracked lifecycle stage and watch the event in HubSpot’s Conversion Events tab. A fake click ID will fail as unreadable, which still proves the event fired.
- Give Google Ads a day or two, then check the conversion actions for new results.
Clean up every test entry, contact and deal when you’re done, so they don’t show up in reporting or get sent to Google.
Before you turn it on
Every step above sends contact information somewhere: hashed emails and phone numbers to Google, call records through CallRail and anything a workflow tool touches along the way. If you work in a regulated field, confirm each tool fits your data rules and agreements before you switch on enhanced conversions or route records through a third party.